background

Friday, August 9, 2013

Spanakopita: A Culinary Adventure!

The peeps think I'm totes cray-cray for making this one.

Most Sundays, the Hubs and I head out to our little church community group, where we have a study and a potluck meal together. One fateful week, the potluck theme was Mediterranean and I had NO IDEA what to make. So, naturally, I headed toward the "interwebz" for inspiration.

This is what happened next.


So, a side note on phyllo dough: It also goes by the name "filo dough" and you will probably find it in the frozen foods section. At our local mart, it's tucked in next to the pies. You should know going in that this dough is extremely finicky. It dries out quickly, so don't open that package until you're ready to roll. Even then, leave it covered as much as possible. The key to using phyllo is to slather it with a butter/oil mixture (included in the recipe). You'll need some kind of basting brush. A spoon works in a pinch, but it's tricky. Don't be stingy with the butter. I mean it. I almost always make an additional half-batch before I'm finished.

You can use whatever oil trips your breaker. Also, you can use cottage cheese instead of ricotta. Lastly, the spinach is a rather flexible amount. 10oz is a typical bag of frozen spinach, which is a perfectly fine way to go, just make sure you squeeze the liquid out of it before you use it! I keep fresh spinach in the house most of the time, so I just emptied a big 24oz bag of it into the steamer and used that. Whatever route you go, just make sure it is as liquid-free as possible, or your filling will be runny

Have I scared you off yet? Don't worry, we're through the most intimidating part.

What to do? What to do.
First thing, get the filling going Mix together the cooked spinach, feta, ricotta, and egg. Put it in the refrigerator. (It's not the end of the world if you don't refrigerate it, but it does make it thicker and so much easier to roll) Next, heat up that 1st tablespoon of oil in a skillet, and toss in both your white and green onions. Cook them until soft, about 3 or 4 minutes. Mix them into your filling. I sometimes add a dash of salt and pepper as well. Leave it in the refrigerator. 

Now melt your stick of butter in a bowl and mix with the remaining tablespoons of oil. This is the lifeblood of your phyllo. Brushes at the ready!

Ok, time for the fun part. Set yourself up a little rolling station. Mine is (from right to left), pile of phyllo, bowl of filling, space for phyllo rolling, butter/oil dish and brush. This gives you some idea...


Ready to open that phyllo? Ok go!


Gently pull out your first sheet of dough. Lay it on your clean, dry counter top and brush it with your butter/oil mixture. Get yourself a second sheet of phyllo, lay it on top of the first one, and bush it with more butter. This is what you see to the right. Those black splotches on the dough is my black counter top showing through. Yes, that is how paper-thin this dough is.


Next, you're going to take the top end of the phyllo sheet and match it to the bottom, folding the dough in half. Then (you guessed it!) brush it with the butter/oil mixture. Do not attempt to reposition the dough on the counter. The less you handle it, the better.

I feel like I should interject that there is no time for perfection with this project. Do not attempt to reposition the second sheet of phyllo because it isn't lined up. It doesn't matter in the end, I promise. Let go of the OCD and embrace the flaws. The same goes for cracks or tears in the dough as you work. Unless you have filling spilling out, do like John Lennon and let it be.


 Alright peeps, it's filling time! Scoop a couple of spoonfuls of filling on the bottom portion of your dough and fold the bottom edge over it. Think enchiladas or burritos. That's really what we're doing here. Spanakoburritos.


Carefully fold in the sides, and brush these new exposed sides with the butter/oil mixture.

Now just roll it up like a little burrito and lay it, seam down, in a pan. Brush the top with some more of that butter/oil mix. Do that right away for each roll in the pan so they don't dry out while you're rolling the rest.


Work your way through the rest of your filling or the rest of your dough, whichever runs out first. Let me know if you ever get it to work out properly. I never do, and it's always a surprise which one runs out.

Once you've got a full pan and then some, pop it in the oven at 375 for 30-35 minutes, until they're crispy and golden brown.


Now take them to your potluck and bask in all the compliments! No one needs to know how easy it was...

Thursday, August 8, 2013

On Wastefulness and One Small Way to Lessen It.

It pains me to throw out food. To the point where I sometimes feel the need to apologize to the moldy macaroni as it sits in the trash. Sorry, squishy strawberries. Sorry I didn't make you into a delicious smoothie before you withered in the back of the fridge. Apologies to you, stale bread, for not taking notice of how long you have been in the cabinet...

I keep track of what our groceries cost (I'm not an all-out coupon girl, but I'm pretty frugal, if I do say so myself) and throwing away food adds up pretty quickly. The average American throws out anywhere from 25% to 40% of the food they buy. Dang, that's a stinkin' lot! As a farmer's daughter, I actually know the kind of hard work that goes into putting food on the table, which only adds to my disappointment when I am forced to chuck something out.

So what's a girl to do? Simple. Use the food before it goes bad. Easier said than done though, right? Around here, our Achilles' heel is bread. Sandwiches are good, but we make one or two, then the rest of the loaf just sits around. It also doesn't help that I like experimenting with different bread recipes that don't always turn out like I'd hoped. Bread is a fickle beast, no?

Cue today's recipe:

Here is my favorite way to re-purpose bread that has gone stale. In fact, it works best with stale bread.

Here we have my specimens-- leftovers from a party, still hanging around long after the hotdogs and hamburgers were gone. The best part of this recipe is that you can use whatever kind of bread you have in the house. It even works with fresh bread, though I recommend leaving it open on the counter overnight to dry out first.
 
I find the bread clumps up and gets all gunky if it's too moist. If you're using fresh bread and in a rush, just put it in the oven at a low temp for 15 minutes or so. Just enough to take some of the moisture out. You could also lightly toast it, but that takes a long time if you've got a big batch.


Break the bread up into chunks and throw it in a food processor. Yes, I'm using a coffee grinder. Yes, I know I shouldn't do that. It will be fine. I promise.

Grind it up to your preference. I like them a little bit on the coarse side, because I primarily use them as breading. Use your best judgement.


Spread them out on a baking sheet. It should be a thin layer. If you pile them too thick, they won't bake properly.

Bake at 350 for 30 minutes, or until they have a nice golden brown color. Stir them at least once so they bake evenly. When they are done, they no longer clump together and feel a little like coarse sand.


Ready to go!

You can bake more or less depending on your preference. Remember that these will bake more when you use them in recipes, so don't overdo it. We're just trying to remove all the moisture from them, really.


These keep about a month in dry storage, or up to a year in the freezer, provided no significant moisture gets in. The best part about freezing them is that there is no need to thaw before you use them!

Mine are all set! They're just sitting around in the cabinet now, ready for some baked chicken or crispy casserole!

Enjoy!


\

Tuesday, August 6, 2013

We Love Blue Cheese!

As if you didn't already know.


I love pork, but I used to skip making it because I detest eating dry meat, and pork seems to be especially prone to that issue. I am nothing if not determined though, so now I try recipe after recipe to find one that produces the desired results.

Here is one such recipe.

What I did:
Season the pork chops with the pepper and garlic. The amounts here are just a suggestion. Season to taste.

Melt the butter in a skillet over medium heat. Place the chops in the pan and cook until no longer pink. My thin chops took 7 minutes each side. Thicker cuts may take 10-12 minutes each side. The juices should run clear. If in doubt, cut into it a smidgen. You're going to coat it in gravy anyway.

Once the pork is all cooked, set it aside somewhere that it will keep warm. (I warm a plate, put the chops on it, and set it in the microwave.)

Stir the cream and blue cheese into the skillet you just took the pork out of. Scrape the cooked pork crumbles off the bottom of the pan as you stir. Trust me on this one. Cook, stirring constantly, 5-7 minutes, or until the blue cheese is mostly melted and the sauce thickens. Remember it will thicken more as it cools, so don't overdo it.

Now all that is left is to pour the gravy over the pork chops and enjoy!


I love the way the pork turns out, even before the gravy is added to the mix. It leads me to believe that pan-fried in butter is the best way to make moist pork chops. What do you think? What works best for you?


Sunday, August 4, 2013

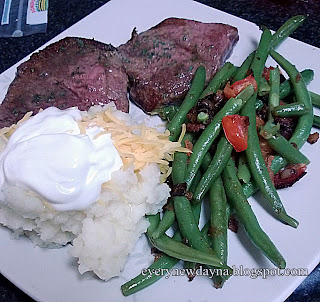
Tennesee Eats: "Creole" Green Beans

A couple of Christmases ago, I received a fun cookbook as a gift from a special guy who wanted me to cook out of it. I love cookbooks and new recipes, so it was quite perfect.

Context: He's from the South, I'm from the Midwest. He's a city boy, and I'm a farm girl. Still, we're not so far apart as you might think, especially when it comes to what's for dinner.

There are a few foods that are foreign to one of us and not the other. Greens are (or rather, were) a mysterious food to me, while he has never tried the tasty joy that is lefse, or kuchen, or krumkake.

So, naturally, I picked up this cookbook and went straight for the most Midwestern-looking dish in there: green beans with bacon. I've had a relative or two bring these babies to a potluck, so I had some idea of what I was in for. Plus, anything involving bacon is bound to be good.

And it was. Oh it was.


It was delicious. Especially with that restaurant-style steak.

What to do: Steam the green beans until crisp-tender. Cook the bacon until it is crispy. Transfer the bacon to paper towels to blot and crumble.

Do not drain the grease from the pan! 

Saute the chopped onion and pepper in the bacon drippings until they are tender. Blend in the flour, brown sugar, Worcestershire, salt, pepper, and mustard. Add the chopped tomatoes and cook. If you find your tomatoes aren't very juicy, you can add a touch of water to help it get saucy. Add green beans and bacon crumbles and heat thoroughly.

Enjoy your little taste of the Midwestern South!


Friday, August 2, 2013

All About Corn.


I've been away on vacation to the farm. I know "vacation" and "farm" are two words not often used in the same sentence together, but for this transplanted San Diegan, going back to the farm is a vacation indeed.


See what I mean? Vacation at its finest. Shooting sports, incredible views, and just chillaxin. I enjoy the farm even more now that I don't have a seemingly endless list of chores. I even got the chance to show off my cooking skills to my papa, who thoroughly enjoyed a concoction my sister and I came up with for stuffed peppers, breaded eggplant, and saucy green beans, all taken directly from my mama's large and overflowing garden. Maybe I'll share it with you if I can remember what we did.

So, the vacation is over. Back on topic.

Where I come from, corn is it. Especially in the late summer. It was on the table so often then that I feel all warm and sun-baked every time I make it. We were shucking bushels of it every day, straight out of the garden. Mom cooked it, canned it, bagged it, froze it, and prepped it in every other way possible for storage so we could have it all year round. Despite that, we were still giving bags of ears away to the "town folk" that didn't have space to grow their own. Corn is such a big deal in South Dakota that we have a palace decorated with murals made from it.

Why am I telling you all this?

Because, for something so ingrained in my way of life, I discovered recently that I've been doing it wrong all this time. Shocking, I know.

Now I'm not telling you there is only one way to cook an ear of corn. As with a lot of foods, there are as many ways of making it as there are people doing the cooking. What I am saying is that this is one way to get a great result every time.

And it's easy. Oh so easy. It's so ridiculously easy that I'm left wondering why I've been bothering with boiling it all this time.

Put it in the oven. If you've been doing it this way for years I'm sure you're having a good chuckle right now, but an oven isn't something we turned on in the summer in our non-air-conditioned farm house, so cut me some slack, k?

It's as simple as this: Preheat the oven to 350. Wet the husks of the ears of corn. You can soak if you're nervous about husks burning, but it's not necessary. The corn steams enough to keep the husks from drying out. Make sure you pull out any silks dangling out the top. The husks aren't a fire hazard at that temperature, but the silks are.

Throw those puppies in the oven and bake for 30 minutes.

Carefully pull the corn out of the oven and cut the butt off.


Now, there are two schools of thought on which direction to shuck the corn.

1) From the bottom (the end you just cut off). Many people say if you pull the corn out of the husks this way, you get almost no silks.


I don't find this to be true, but I'm willing to admit I might be doing it wrong.

I've been cooking corn wrong all this time, so who knows?


2) Peeling the husks off from the top.


This is what works for me.

Either way, be careful!

IT'S HOT! 

 That's really all there is to it, my friends. Enjoy!


Thursday, July 18, 2013

The Favorites Files: Baked Pecan Tilapia!


This is one of my favorite ways to make fish. I stole it out of a cookbook I borrowed from the library some time ago. It has earned the rare honor of making "The Book."

My mother gave me this divided little notebook for Christmas some years ago. It already contained some of her favorite recipes and several of the prize-winning recipes that I made for 4-H fair entries growing up. Needless to say, I treasure it.

Space is a premium in this book, so recipes don't get glued down willy-nilly. They have to be tried, tested, tried again, tested again, and (most of all) loved.

Hopefully, these are the recipes that my descendents will seek out.

This little fishy has earned his place.


As the card says, you can substitute other fish for tilapia, though I would like to note that Every New Dayna is not responsible for the outcome. I love tilapia, it's what the original recipe called for, and I've never made it any other way.

What to do: Preheat the oven to 450F. Put the bread crumbs and seasoning together in a shallow dish. Place the fish, one at a time, into the dish and gently shake and turn to coat.

Put the filets into a baking dish. Press the chopped pecans into the top to make a crust. You can be as picky or not picky about it as you want. As you can see from the photos, I'm on the not picky side of things.

Juice the lemon over the filets. Melt the butter and pour it over the fish as well. Toss it in the oven for 15 minutes. Delicious!


Monday, July 15, 2013

Simple Sweet and Spicy Seasoning!


Before we were married, my husband and I each lived pretty close to the San Diego/Tijuana border. His place was so close to the best straight-from-Tijuana tacos that we just ate out when we wanted Mexican. Plus, San Diego has this glorious thing known as the California Burrito. Simply delicious, but I digress.

So yeah, not a lot of need for me to keep taco seasoning around. Now, though, we live in the Northern part of San Diego and good Mexican is much, much harder to find. Once you know better, the Americanized Mexican that exists up here just isn't the same as those Tijuana "El Gordo's" Tacos. (San Diegans know what I'm talkin'bout when I say El Gordo's. Oh yeah.)

I'm not promising El Gordo's, but we love these tacos better than any shop up here, and a lot more than the 45 minute drive to the border. It's the closest we can get without a cow on a spit.


Not to mention it's as easy as dumping some seasonings together.
This recipe seasons 1lb of ground beef for tacos. Adjust accordingly.

Dump.
Shake.
Season.


I think we're done here. Enjoy!